Blog
An Intro to Autonomous Cost Optimization on Kubernetes with Karpenter
By Erwin Daria | Oct 20, 2023

Blog
By Erwin Daria | Oct 20, 2023
In the ever-evolving landscape of cloud computing and container orchestration, Kubernetes has emerged as the go-to platform for deploying and managing containerized applications. In our previous installment of this tutorial blog series, we discussed the importance of resource optimization across multiple levels within the Kubernetes operating paradigm and the need to drive those cost optimizations automatically. In this blog, we’ll delve into the challenge of node optimization and we’ll explore a powerful solution from AWS which dramatically simplifies node management for Kubernetes while improving resource costs: Karpenter.
Before we dive into Karpenter itself, let’s first explore the importance of node autoscaling in Kubernetes.
Node autoscaling is a crucial feature in Kubernetes that dynamically adjusts the number of worker nodes in a cluster to match the current workload and resource requests of deployed applications.

When application workloads increase, such as during traffic spikes or resource-intensive tasks, node autoscaling automatically adds new nodes to the cluster, allowing for additional compute capacity to handle the increased load. Node autoscaling plays a pivotal role in achieving high availability and performance optimization in Kubernetes environments.
Cluster Autoscaler is a valuable tool for dynamically adjusting the number of nodes in a Kubernetes cluster to match the resource requests of deployed workloads. However, it is not without its imperfections. One notable challenge lies in the complexity of designing autoscaling groups that take the various resource shapes of deployed workloads into consideration. Each set of deployed workloads may have different CPU and memory configurations making the act of matching workloads to nodes a complex task. Additionally, node provisioning times can make it difficult to scale out compute resources in time to respond to application usage spikes or surges.
In either case, many organizations simply live with massively over-provisioned resource capacity and the runaway costs that accompany them.
Built by AWS, Karpenter is a node autoscaling solution designed to efficiently manage and optimize node provisioning for Kubernetes clusters.
It improves upon the Kubernetes-native Cluster Autoscaler, by providing intelligent node autoscaling and opportunistic workload consolidation in an effort to improve the match between node resource capacity and workload requests. Karpenter is also optimized to provision and deprovision a wider array of instance types when compared to standard auto-scaling groups. The result being much improved cost performance and better utilization of compute resources.
In order to illustrate the differences between node provisioning between Cluster Autoscaler and Karpenter, we will be using a couple of tools against our sample environment:
For instructions on deploying and configuring auto-scaling groups with Cluster Autoscaler on EKS, please refer to AWS’ official documentation.
For instructions on deploying and configuring Karpenter, please refer to Karpenter’s official documentation.
For specific configurations used in this blog, please refer to StormForge’s GitHub.
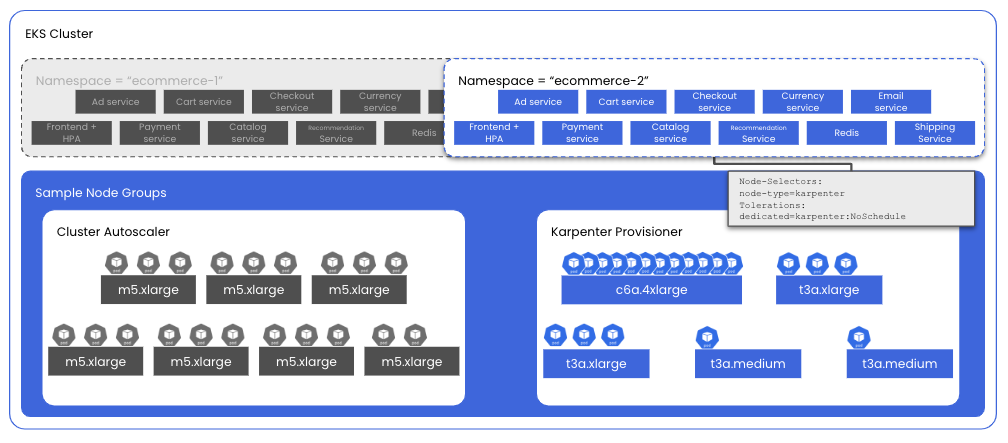
In addition to the tools listed above, our sample Kubernetes environment is configured with two node groups:
m5.xlarge on-demand instancesamd64 on-demand instances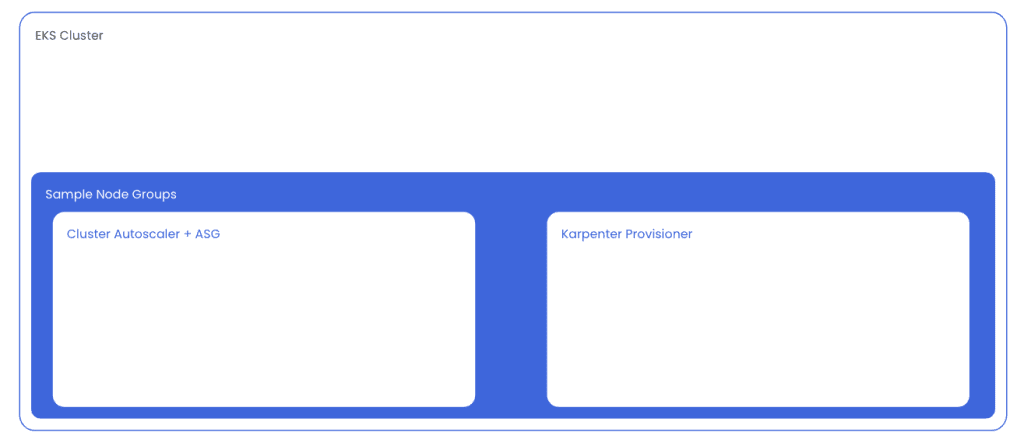
With the infrastructure details out of the way, let’s review our testing methodology.
Our goal in this blog is to use a control set of Kubernetes objects (our microservices demo) to induce each node provisioner to add a set of worker nodes to the cluster and to compare the costs for each.
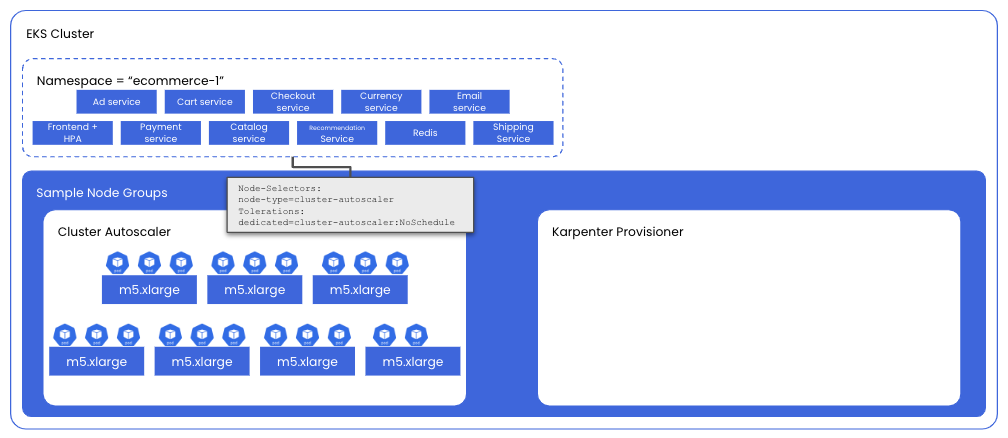
The first step is to create a set of node-labels and taints on each set of nodes to ensure that only the desired set of pods is scheduled on them.For the Cluster Autoscaler nodes:
labels:node-type=cluster-autoscaler
taints:dedicated=cluster-autoscaler:NoSchedule
For the Karpenter nodes:
labels:node-type=karpenter
taints:dedicated=karpenter:NoSchedulenodeSelector and Tolerations to ensure that our pods are scheduled using each of the respective node provisioners.eks-node-viewer to review and compare the projected monthly cost of each set of nodes.To deploy our microservices demo onto nodes managed by Cluster Autoscaler, we’ll use helm:
helm install ecommerce-1 -n ecommerce-1 microservices-demo \
  --create-namespace \
  --values values.yaml
Included in the values.yaml file:
nodeSelector:
  key: node-type
  value: cluster-autoscaler

tolerations:
  key1: "dedicated"
  operator1: "Equal"
  value1: "cluster-autoscaler"
  effect1: "NoSchedule"
Figure 5: For reference, the values.yaml file includes both the nodeSelector and tolerations for our Cluster Autoscaler nodes.
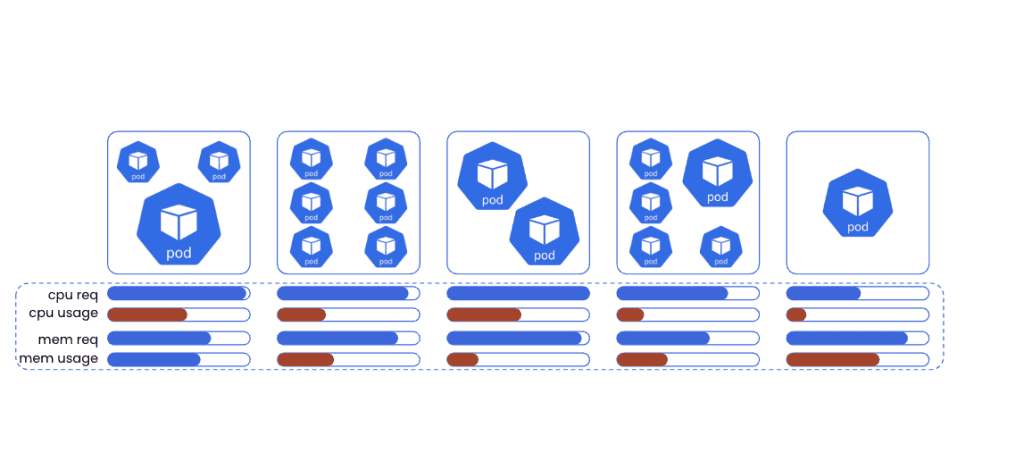
In order to provide compute capacity to successfully schedule all pods, Cluster Autoscaler provisions 7 x m5.xlarge instances to provide the compute capacity requested by our microservices.
With all 20 microservices demo pods successfully running, we can use eks-node-viewer to visualize the monthly costs for these instances.
eks-node-viewer -node-selector node-type=cluster-autoscaler -resources cpu,memory EKS-Node-Viewer Output:
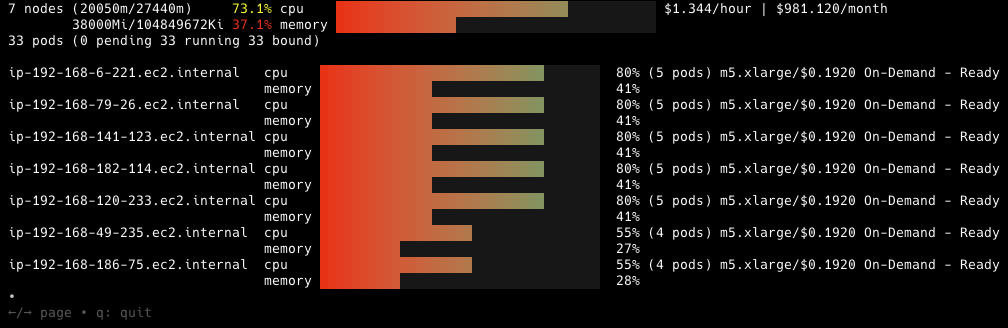
By using eks-node-viewer we can clearly see a few interesting bits of information associated with our microservices demo application:
Aside from the cost numbers highlighted by eks-node-viewer, it’s relatively obvious to see that at this scale, this group of nodes would quickly become CPU bound, resulting in an excess of memory capacity that may never be used. Of course, we may choose to carefully monitor compute capacity; see where we can opportunistically schedule memory optimized deployments; modify them with the appropriate nodeSelectors and tolerations and we can manually binpack these nodes to get the most out of them…but the reality is that most organizations simply don’t have the operational bandwidth and will simply ignore the wasted memory and accept the overprovisioning and associated costs.
In the end, this is the exact problem that Karpenter was designed to solve. Let’s take a look at how Karpenter provisions nodes dynamically and efficiently using the exact same demo application.
To deploy our microservices demo onto nodes managed by Karpenter, we’ll once again use helm, this time passing a different values file with the appropriate nodeSelector and tolerations for our Karpenter provisioner:
helm install ecommerce-2 -n ecommerce-2 microservices-demo \
  --create-namespace \
  --values karpenter-values.yaml
Included in the values.yaml file:
nodeSelector:
  key: node-type
  value: karpenter
tolerations:
  key1: "dedicated"
  operator1: "Equal"
  value1: "karpenter"
  effect1: "NoSchedule"
Figure 8: For reference, the karpenter-values.yaml file includes both the nodeSelector and tolerations.
Unlike the autoscaling node group used with Cluster Autoscaler above, Karpenter is given free rein to choose from any available instances, so long as they match the following criteria:
requirements:
    - key: "kubernetes.io/arch"
      operator: In
      values: ["amd64"]
    - key: "kubernetes.io/os"
      operator: In
      values: ["linux"]
    - key: karpenter.k8s.aws/instance-generation
      operator: Gt
      values: ["2"]
    - key: "karpenter.sh/capacity-type"
      operator: In
      values: ["on-demand"]
Figure 9: This Karpenter provisioner can provision any on-demand EC2 instance available.
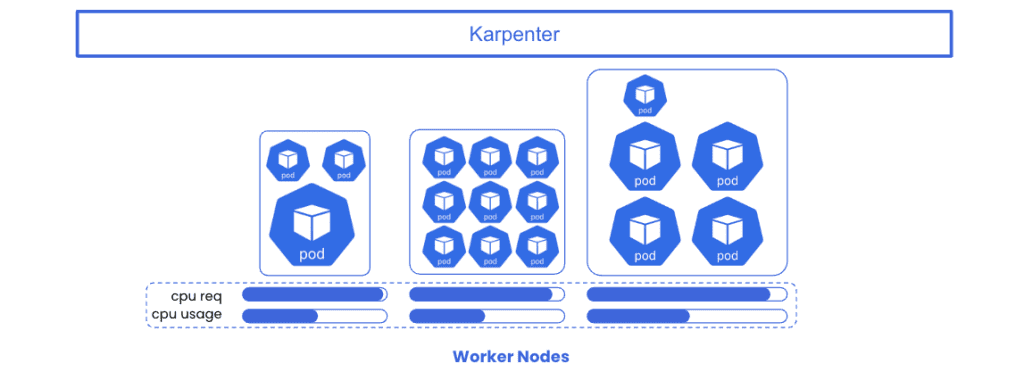
With the freedom to provision any number of instance types to provide compute capacity for our microservices demo application, Karpenter chooses to provision three different instance types to accommodate each set of pods resource requests: c6a.4lxarge, t3a.xlarge, and t3a.medium
With the same 20 microservices demo pods successfully running, this time using Karpenter-provisioned nodes, we can use eks-node-viewer again to visualize and compare the monthly costs for these instances.
eks-node-viewer -node-selector node-type=karpenter -resources cpu,memory
EKS-Node-Viewer Output:
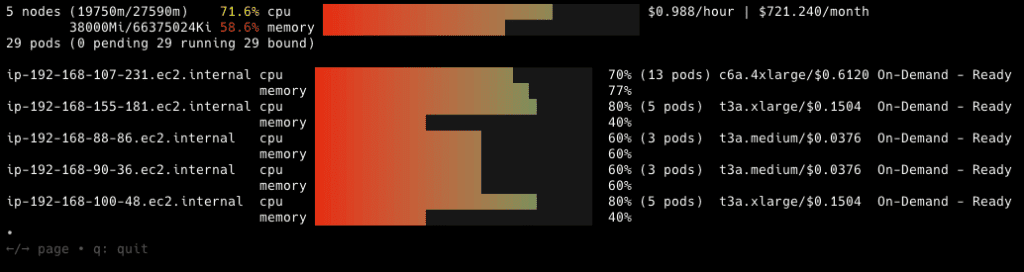
This time, eks-node-viewer shows our Karpenter-managed nodes and we can compare the values with what we saw from Cluster Autoscaler:
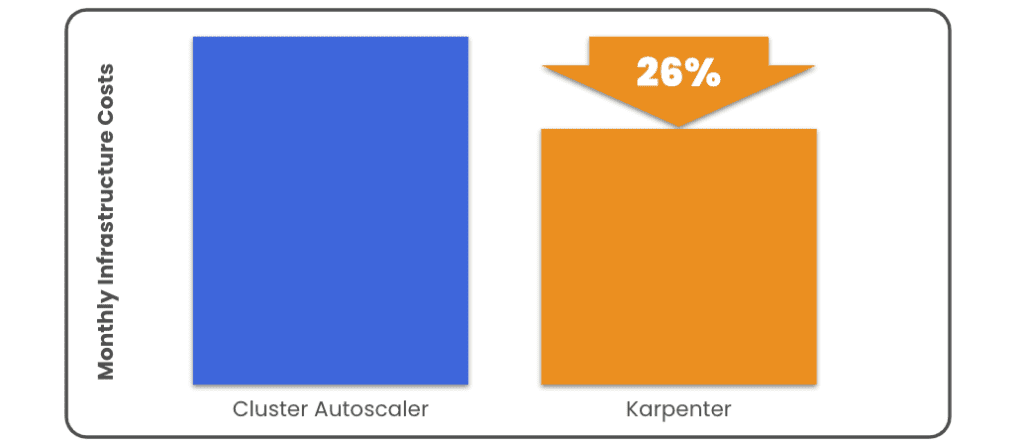
In this case, we can see that Karpenter is much more intelligent about understanding the resource requests being made and finding a mix of instances that provide the required compute capacity while minimizing over-provisioning and costs when compared to traditional Cluster Autoscaler configurations.
With our microservices demo application successfully deployed using both Cluster Autoscaler and Karpenter, we can see that Karpenter is proven to be a powerful tool that can streamline the process of picking and choosing the right instance types to provide compute capacity to your Kubernetes cluster. Nodes provisioned by Karpenter are a better match for the resource requests made by deployed workloads when compared to hand configuration of auto-scaling node groups and benefit from much better cost performance metrics.
With our infrastructure costs handled by Karpenter – we can move on to the next step in our cost-optimization journey: Workload Resource Right-Sizing
Because we know that intelligent node provisioners, like Karpenter, use aggregate resource requests from pending workloads to calculate the shape and quantity of worker nodes to provision to a cluster, it begs the question: Are my workload resource requests set at the right levels? Can we right-size these workload resource requests to ensure that our node autoscalers are even more efficient?
The short answer is yes. And we’ll cover Workload Resource Right-Sizing with StormForge Optimize Live in the next installment of our blog series: Implementing and Managing Optimize Live for Workload Resource Right-Sizing.
We use cookies to provide you with a better website experience and to analyze the site traffic. Please read our "privacy policy" for more information.


